DIY Wind Turbine to Power Your Home: The Realistic Guide to Self-Sufficiency
Picture this: a crisp breeze flows through your property, and instead of just rustling leaves, it’s actively generating electricity, silently powering your home. The dream of a DIY wind turbine to achieve energy independence is incredibly alluring, promising freedom from utility bills and a smaller carbon footprint.
Table of Contents
- DIY Wind Turbine to Power Your Home: The Realistic Guide to Self-Sufficiency
- Is a DIY Home Wind Turbine Really for You? Setting Realistic Expectations
- The Allure vs. The Reality: Why DIY Wind Isn’t a Silver Bullet
- Key Questions Before You Start: Wind Resource, Budget, Skill, and Goals
- Understanding the Fundamentals: How a Wind Turbine Works for Your Home
- Core Components of a Home Wind System
- AC vs. DC Systems: What You Need to Know for Home Power
- Assessing Your Wind Potential: The Critical First Step
- Wind Speed Matters: Average Speeds and Power Output
- Obstacles and Turbulence: Site Selection is Key
- Simple Ways to Gauge Your Property’s Wind Resource
- Different DIY Approaches: From Hobby to Home Backup
- Small-Scale DIY: For Charging Devices & Small Loads
- Car Alternator Wind Turbines: The Popular, Budget-Friendly Option
- Larger Custom Builds: Stepping Towards Partial Home Power
- Essential Components for Your DIY Wind Power System
- Choosing Your Generator/Alternator: Power & Efficiency
- Blade Design & Materials: Aerodynamics Made Simple
- Tower Construction: Height, Stability, and Safety
- Charge Controllers & Inverters: Protecting Your System & Converting Power
- Battery Bank: Storing Your Wind Energy
- Step-by-Step: General Construction & Installation Guidelines (Safety First!)
- 1. Planning & Design (The Blueprint)
- 2. Building the Rotor & Generator Assembly
- 3. Constructing and Erecting the Tower (CRITICAL SAFETY!)
- 4. Wiring Your System: Controller, Batteries, Inverter
- 5. Testing and Monitoring
- Beyond the Build: Legal, Safety, and Maintenance Considerations
- Permits, Zoning, and HOA Regulations: Don’t Get Blown Away By Fines
- Safety Protocols: Working at Height, Electrical Hazards
- Ongoing Maintenance: Keeping Your Turbine Spinning Safely
- DIY Wind vs. DIY Solar: Which is Right for Your Home?
- Pros and Cons of Each for DIY Home Power
- Hybrid Systems: The Best of Both Worlds?
- Is a DIY Wind Turbine Enough to Power an Entire Home?
- Realistic Expectations for Full Home Power
- The Role of Energy Efficiency in Off-Grid Living
- Conclusion: Your Path to Empowered Self-Sufficiency
But let’s be honest: the internet is full of glorified success stories and overly simplistic guides. The reality of building a wind turbine capable of meaningfully powering a home, especially entirely off-grid, is far more complex than just bolting a few parts together. It demands meticulous planning, realistic expectations, significant effort, and a hefty dose of safety consciousness.
If you’re serious about harnessing the wind, you need to know the truth—the good, the bad, and the breezy. This isn’t a guide to build a decorative garden spinner; this is a deep dive into whether a DIY home wind turbine is genuinely viable for *your* energy needs, what it truly takes, and what you can realistically expect.
Is a DIY Home Wind Turbine Really for You? Setting Realistic Expectations
Before you even think about buying a wrench, you need to confront some hard truths. The romantic notion of a homemade wind turbine effortlessly erasing your power bill often crashes against the unforgiving realities of physics, cost, and logistics.
The Allure vs. The Reality: Why DIY Wind Isn’t a Silver Bullet
The appeal is clear: free energy, self-reliance, and the satisfaction of building something powerful with your own hands. However, the path is fraught with challenges. Most small-scale DIY turbines, while fantastic for charging batteries or running a few LEDs, rarely generate enough consistent power to run an entire modern household. You’re up against highly engineered commercial systems designed for efficiency, durability, and safety, often costing tens of thousands of dollars.
The question isn’t just “Can I build one?” but “Will it provide meaningful power reliably and safely, and at what true cost (time, money, effort)?”
Key Questions Before You Start: Wind Resource, Budget, Skill, and Goals
Before you commit, ask yourself:
- Do you have enough wind? This is the absolute biggest factor. No wind, no power.
- What’s your budget? Materials, tools, safety gear, and potentially professional assistance add up.
- What’s your skill level? Electrical work, metal fabrication, and working at heights are often involved.
- What are your energy goals? Charging a phone? Running a small shed? Powering your entire home?
- Are you prepared for the legalities? Permits, zoning, HOA rules can be showstoppers.
Let’s put it into perspective:
| Feature | DIY Home Wind Turbine (Typical) | Professional Home Wind Installation |
|---|---|---|
| Cost (Materials Only) | $500 – $5,000+ (Highly variable) | $15,000 – $80,000+ (Installed) |
| Power Output (Peak) | 50W – 1,000W (Often intermittent) | 1,000W – 10,000W+ (Consistent with wind) |
| Complexity | High (Design, fabrication, electrical, safety) | Low for homeowner (Installer handles all) |
| Permitting/Regulations | Still required; homeowner’s responsibility | Installer often handles paperwork |
| Warranty/Support | None; entirely DIY | Manufacturer/installer warranties |
| Safety | Entirely dependent on builder’s expertise and adherence to standards | Built to industry safety standards; professionally installed |
Understanding the Fundamentals: How a Wind Turbine Works for Your Home
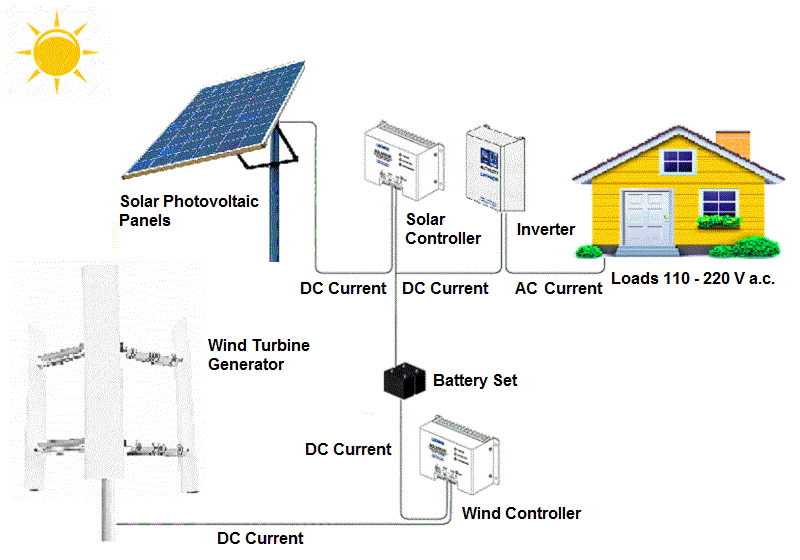
At its core, a wind turbine is remarkably simple. Wind turns blades, which spin a generator, creating electricity. But integrating this into a home power system involves several key components.
Core Components of a Home Wind System
Regardless of whether it’s DIY or commercial, a functional wind power system needs these parts:
- Rotor (Blades): Catches the wind’s energy. Design, material, and number of blades heavily impact efficiency.
- Nacelle (Generator Housing): Contains the generator, gearbox (if any), and yaw mechanism.
- Generator: Converts the mechanical energy of the spinning blades into electrical energy. Often a permanent magnet alternator (PMA) or a modified car alternator for DIY.
- Tower: Lifts the turbine high enough to catch consistent, less turbulent wind. Crucial for performance.
- Charge Controller: Regulates the power from the turbine to the battery bank, preventing overcharging.
- Battery Bank: Stores the electricity generated by the turbine for use when the wind isn’t blowing.
- Inverter: Converts the DC (Direct Current) power from the batteries into AC (Alternating Current) power, which is what most home appliances use.
- Wiring & Safety Disconnects: Connects all components safely and allows for system shutdown.
AC vs. DC Systems: What You Need to Know for Home Power
Most small DIY wind turbines generate DC power, which is ideal for directly charging batteries. Your home appliances, however, predominantly run on AC power. This means you’ll almost certainly need an inverter. Trying to run a household purely on DC is possible but requires specialized (and often expensive) DC appliances and extensive rewiring.
For a DIY project, you’re likely building a DC charging system that feeds a battery bank, which then uses an inverter to provide AC power to a subset of your home’s circuits or specific appliances.

Assessing Your Wind Potential: The Critical First Step
This is where many DIY dreams either take flight or get grounded. Without sufficient, consistent wind, even the most beautifully crafted turbine is just an expensive lawn ornament.
Wind Speed Matters: Average Speeds and Power Output
Wind turbine power output is not linear; it’s proportional to the cube of the wind speed. This means a slight increase in wind speed results in a dramatic increase in power. For example, doubling the wind speed delivers eight times the power!
Most small home turbines need an average wind speed of at least 10-12 MPH (4.5-5.5 m/s) to be truly effective. Below this, they might spin, but they won’t generate much usable power. Many areas simply don’t have these consistent wind resources.
Obstacles and Turbulence: Site Selection is Key
Wind is rarely uniform. Buildings, trees, and hills create turbulence, eddies, and dead spots. You need clear, unobstructed airflow. Ideally, your turbine should be at least 20-30 feet higher than any obstruction within a 500-foot radius. This is why tall towers are essential, and often the most challenging part of a DIY installation.
Simple Ways to Gauge Your Property’s Wind Resource
- Local Wind Data: Check online resources like the National Renewable Energy Laboratory (NREL) wind maps or local airport data. This gives a general idea, but localized effects are crucial.
- Anemometer: The best way. Install a simple anemometer (wind speed meter) on a temporary mast at the proposed turbine height. Monitor it for several months to a year to get an accurate picture of your specific site’s wind profile. This is an indispensable investment.
- Observation: Look at trees, flags, and smoke patterns. While not scientific, it can give you a preliminary sense of prevailing wind directions and turbulence.
Different DIY Approaches: From Hobby to Home Backup
DIY wind turbines aren’t one-size-fits-all. Your goals will dictate the complexity and scale of your project.
Small-Scale DIY: For Charging Devices & Small Loads
These are typically proof-of-concept projects, often using readily available materials like PVC pipes for blades and small DC motors (from old printers or treadmill motors) as generators. They are excellent for learning the basics of wind power and can charge small 12V batteries for things like camping lights, phone chargers, or remote sensors. They are not designed for home power, but a great starting point.
Car Alternator Wind Turbines: The Popular, Budget-Friendly Option
This is one of the most common DIY approaches. Car alternators are cheap, robust, and designed to generate electricity. However, they have drawbacks:
- Cut-in Speed: Many alternators require relatively high RPMs to start generating significant power, meaning they need stronger winds.
- Efficiency: They aren’t optimized for low-RPM wind generation like dedicated permanent magnet alternators (PMAs).
- Modification: Often need modification (e.g., converting to a permanent magnet generator by replacing electromagnets with rare-earth magnets) to improve low-wind performance.
Steps for a Car Alternator Build (General):
- Alternator Selection: Choose a robust, readily available alternator (e.g., from an older car, often 60-100 amp rated).
- Blade Design: Fabricate efficient blades (wood, PVC, fiberglass) designed to spin the alternator at its optimal RPM in your wind conditions.
- Mounting & Hub: Create a sturdy hub to attach blades to the alternator shaft and a robust mounting system for the alternator itself.
- Tail Vane: Design a tail vane to orient the turbine into the wind.
- Tower & Electrical: Connect to a tower and integrate into a charge controller, battery bank, and inverter.
Larger Custom Builds: Stepping Towards Partial Home Power
These projects move beyond repurposed car parts and often involve custom-wound permanent magnet alternators, larger fabricated blades, and more substantial towers. The goal here is usually to supplement grid power or provide significant backup. This requires advanced skills in electrical engineering, fabrication, and structural design. The costs escalate quickly, blurring the line between DIY and professional kits.
Let’s compare the potential of these different DIY types:
| DIY Wind Turbine Type | Typical Output Range | Estimated Material Cost | Complexity Level | Best Use Case |
|---|---|---|---|---|
| Small-Scale (Hobby) | 5W – 50W | $50 – $300 | Beginner to Intermediate | Battery charging (small), education, remote sensors |
| Car Alternator Based | 100W – 500W | $300 – $1,500 | Intermediate to Advanced | Charging larger battery banks, partial off-grid for sheds/cabins, small appliances |
| Larger Custom Builds | 500W – 1,500W+ | $1,500 – $5,000+ | Advanced (requires engineering & fabrication skills) | Significant grid offset, substantial off-grid backup/power |
Essential Components for Your DIY Wind Power System
Let’s break down the critical parts you’ll need to source or build.
Choosing Your Generator/Alternator: Power & Efficiency
This is the heart of your system. For DIY, common choices include:
- Modified Car Alternators: As discussed, cheap but may need magnet upgrades for better low-wind performance.
- Permanent Magnet Alternators (PMAs): Designed specifically for wind, they are more efficient at lower RPMs and don’t require an external excitation current. More expensive, but often a better investment for serious power generation. You can even buy plans or kits to wind your own.
- Motor Conversion: Some large DC motors can be repurposed as generators, but their efficiency varies.
Look for generators with a low “cut-in speed”—the minimum wind speed required to start generating usable power.

Blade Design & Materials: Aerodynamics Made Simple
Blades are crucial for capturing wind energy. Key considerations:
- Number of Blades: Three blades are common for efficiency and balance. More blades can start at lower wind speeds but sacrifice some top-end efficiency; fewer blades are faster but less torquey.
- Material:
- Wood: Common for DIY. Easy to shape (carve), but needs weather protection.
- PVC Pipe: Cheap and easy to work with, but less aerodynamic and prone to fatigue. Best for very small turbines.
- Fiberglass/Carbon Fiber: More advanced, offers superior strength-to-weight ratio and aerodynamics, but difficult for DIY.
- Airfoil Shape: The cross-section of the blade (like an airplane wing) generates lift. Proper airfoil design is critical for efficiency. Many DIY plans simplify this, but understanding basic aerodynamics helps.
- Pitch: The angle of the blades relative to the wind. Fixed pitch is simplest for DIY, but adjustable pitch (more complex) optimizes for varying wind speeds.
Tower Construction: Height, Stability, and Safety
The tower is arguably the most critical component for both performance and safety. A taller tower means access to higher, stronger, and less turbulent winds. However, it also means:
- Structural Integrity: Must withstand extreme winds, ice loads, and the forces of the turbine itself.
- Foundation: Requires a substantial concrete foundation to anchor guy wires or a freestanding mast.
- Erection: Raising a tall, heavy tower is a dangerous, multi-person job often requiring specialized equipment.
- Safety: Falls from height are a serious risk during construction and maintenance.
Common DIY tower types include guyed masts (supported by wires) and freestanding lattice towers. Always over-engineer your tower for safety.
Charge Controllers & Inverters: Protecting Your System & Converting Power
- Charge Controller: This device sits between your turbine and your batteries. It prevents your batteries from overcharging (which can damage them or cause fires) and often includes features like dump loads to dissipate excess energy when batteries are full, or braking mechanisms to slow the turbine in high winds. You cannot skip this.
- Inverter: Converts the DC power from your battery bank into usable AC power for your home. You’ll need a pure sine wave inverter for sensitive electronics. Size your inverter based on the peak wattage of all the AC appliances you plan to run simultaneously.
Battery Bank: Storing Your Wind Energy
Since the wind isn’t always blowing, you need to store the generated electricity. A battery bank is essential for any meaningful home power system.
- Deep Cycle Batteries: Designed for repeated deep discharges, unlike car starting batteries. Common types include lead-acid (flooded, AGM, gel) and increasingly, lithium-ion.
- Capacity: Measured in Amp-hours (Ah). Calculate your daily energy consumption and aim for at least 2-3 days of storage to cover periods of low wind.
- Voltage: Match your system voltage (12V, 24V, 48V). Higher voltage systems are more efficient as they have lower current, reducing wire thickness needs.
Step-by-Step: General Construction & Installation Guidelines (Safety First!)
While specific plans vary wildly, here’s a generalized sequence for building and installing a DIY wind turbine. Remember, safety is paramount at every stage.
1. Planning & Design (The Blueprint)
- Research: Study existing plans (e.g., Hugh Piggott designs, various online DIY guides). Don’t reinvent the wheel unless you’re an experienced engineer.
- Site Assessment: Confirm your wind resource (anemometer data!) and identify the optimal tower location.
- Power Needs: Calculate your average and peak electricity consumption (in Watt-hours or kWh per day).
- Component Sourcing: List all materials (generator, blades, tower steel/wood, controller, inverter, batteries, wiring, safety gear).
- Permits & Regulations: Contact local authorities (planning department, HOA) to understand requirements.
- Safety Plan: Identify risks and mitigation strategies for every step, especially tower erection and electrical work.
2. Building the Rotor & Generator Assembly
- Blades: Precisely cut and shape your blades according to your chosen design. Balance them carefully – unbalanced blades cause vibration and can destroy the turbine.
- Hub: Fabricate a sturdy hub to securely attach the blades to the generator shaft.
- Nacelle/Mounting: Build the housing for the generator and the yaw mechanism that allows the turbine to pivot into the wind. Ensure it’s robust enough for high wind loads.
3. Constructing and Erecting the Tower (CRITICAL SAFETY!)
- Foundation: Pour a solid concrete foundation for your tower base and guy wire anchors (if applicable).
- Tower Fabrication: Assemble the tower sections on the ground. Ensure all welds/joints are extremely strong.
- Erection: This is the most dangerous step. NEVER attempt alone. Use appropriate lifting equipment (gin pole, crane, winch). Have a clear communication plan and safety personnel. Ensure the area is clear of people and power lines.
4. Wiring Your System: Controller, Batteries, Inverter
- Turbine to Controller: Run appropriately sized wire from the turbine down the tower to your charge controller.
- Controller to Batteries: Connect the charge controller to your battery bank. Ensure proper fusing and disconnects.
- Batteries to Inverter: Connect the battery bank to your inverter. Again, proper fusing and heavy-gauge cables are essential for high currents.
- Inverter to Load: Connect the inverter to your chosen home circuits or appliances.
- Grounding: Properly ground your entire system to protect against lightning and electrical faults.
- Wiring Diagrams: Follow a detailed wiring diagram meticulously. If unsure, consult a licensed electrician.
5. Testing and Monitoring
- Initial Spin: In low winds, carefully observe the turbine’s operation. Listen for unusual noises, check for vibrations.
- Voltage/Current Monitoring: Use a multimeter to verify correct voltage and current output at various points in the system.
- System Performance: Monitor battery charge levels, inverter output, and overall energy generation over time. Adjust pitch or make minor modifications if necessary.
Beyond the Build: Legal, Safety, and Maintenance Considerations
The construction is just one part of the journey. Living with your wind turbine requires ongoing attention.
Permits, Zoning, and HOA Regulations: Don’t Get Blown Away By Fines
This is a critical, often overlooked aspect. Small wind turbines are subject to local building codes, zoning ordinances, and potentially homeowner association (HOA) rules. You might need:
- Building Permits: For the tower structure and electrical work.
- Zoning Variances: If your tower height exceeds local limits.
- Easement Checks: Ensure your guy wires (if used) don’t cross property lines.
- Noise Regulations: Some areas have limits on noise levels, which can impact turbine selection.
Ignoring these can lead to fines, forced removal, or legal battles. Always check with your local planning department before you start.
Safety Protocols: Working at Height, Electrical Hazards
You are dealing with powerful forces and potentially lethal voltages. Always:
- Work with a Partner: Especially when erecting the tower or doing maintenance at height.
- Use Proper Safety Gear: Hard hats, safety glasses, fall arrest harnesses, insulated gloves for electrical work.
- Disconnect Power: Always disconnect the turbine from the system and ensure blades are locked (if possible) before any maintenance.
- Beware of Lightning: Wind turbines are tall, conductive structures. Proper grounding and lightning protection are essential.
- Rotating Parts: Keep clear of spinning blades. They are invisible blurs at speed.
Ongoing Maintenance: Keeping Your Turbine Spinning Safely
A DIY turbine isn’t a “set it and forget it” system.
- Regular Inspections: Check blades for cracks, bolts for tightness, wiring for wear, and guy wires for tension.
- Lubrication: Grease generator bearings as needed.
- Cleaning: Keep blades clean for optimal aerodynamics.
- Battery Maintenance: If using flooded lead-acid batteries, check electrolyte levels and top up with distilled water.
- Storm Prep: Consider mechanisms to furl or lock your turbine in extreme weather to prevent damage.
DIY Wind vs. DIY Solar: Which is Right for Your Home?
Often, people consider wind and solar together. Both offer avenues for DIY renewable energy, but they have distinct characteristics.
Pros and Cons of Each for DIY Home Power
- DIY Solar (Photovoltaic):
- Pros: Generally simpler to install (no moving parts, less height-dependent), silent, predictable output on sunny days, modular (easy to expand).
- Cons: No power at night, reduced power on cloudy days, requires significant roof or ground space, panels can be fragile.
- DIY Wind:n
- Pros: Can generate power 24/7 (if wind blows), often performs better in winter when solar is weaker, small footprint at ground level (mostly tower).
- Cons: Requires specific wind resources, complex mechanical and electrical build, noisy (some designs), dangerous at height, permitting can be difficult.
Hybrid Systems: The Best of Both Worlds?
For true energy independence, a hybrid wind and solar system is often the most effective DIY solution. They complement each other: wind often blows more at night and in winter, while solar shines brightest during the day and in summer. This combination provides a more consistent power supply, reducing reliance on a single, intermittent source.
| Feature | DIY Wind Turbine | DIY Solar Panels |
|---|---|---|
| Cost (Materials) | $500 – $5,000+ | $1,000 – $10,000+ (depending on scale) |
| Complexity of Build | High (mechanical, electrical, structural) | Moderate (electrical, mounting) |
| Weather Dependency | Wind speed and consistency | Sunlight hours and intensity |
| Operating Noise | Can be noticeable, especially larger units | Silent |
| Maintenance | More involved (moving parts, tower checks) | Low (occasional cleaning, system checks) |
| Permitting Challenges | Often higher due to height, noise, and safety | Generally lower, mostly building codes |
Is a DIY Wind Turbine Enough to Power an Entire Home?
This is the million-dollar question, and for most DIY enthusiasts, the honest answer is: unlikely, unless your energy demands are very low or you invest substantially.
 - Instructables")
Realistic Expectations for Full Home Power
A typical US household consumes around 900-1000 kWh per month. To meet this with a wind turbine means generating roughly 30-33 kWh per day. A 1 kW (1,000 Watt) turbine running at its peak for 24 hours would produce 24 kWh. But turbines rarely run at peak, and wind is intermittent. You’d likely need a multi-kilowatt commercial-grade system to even approach this, not a typical DIY build.
A more realistic goal for a substantial DIY wind turbine (e.g., a well-built 500W-1kW system) is to:
- Offset a portion of your grid consumption.
- Provide backup power for essential loads during outages.
- Power a remote cabin, shed, or specific appliances (lights, small fridge, charging).
Achieving true, 100% off-grid power for a standard home with DIY means a massive investment in a robust, multi-kilowatt wind turbine, an equally large battery bank, and likely supplemental solar panels. It becomes less about “DIY” and more about “self-installed professional components.”
The Role of Energy Efficiency in Off-Grid Living
If your dream is to power your home with DIY renewables, your first, cheapest, and most effective step is drastically reducing your energy consumption. Upgrade to LED lighting, improve insulation, use energy-efficient appliances, and adopt mindful usage habits. Every Watt-hour you don’t use is a Watt-hour you don’t have to generate and store.
Conclusion: Your Path to Empowered Self-Sufficiency
Building a DIY wind turbine to power your home is a monumental undertaking, filled with both incredible satisfaction and significant challenges. It’s not a weekend project, and it’s rarely a path to complete energy independence for the average household without substantial investment and expertise.
However, for the intrepid, the mechanically inclined, and those with a genuine passion for self-sufficiency, it can be an incredibly rewarding journey. Start small, assess your wind resource diligently, prioritize safety above all else, and understand that even a modest DIY system contributing to your power needs is a victory. The wind is there for the taking—just make sure you understand how to harness it realistically and responsibly.
Frequently Asked Questions
Can a DIY wind turbine really power an entire house?
For most typical homes, a DIY wind turbine alone is unlikely to provide 100% of your power. Realistic expectations for a DIY build are usually to offset a portion of your electricity bill, provide backup power for essential loads, or power a remote shed or cabin. Achieving full home power requires a multi-kilowatt system, often combining wind with solar and a substantial battery bank, which quickly escalates beyond typical DIY scope.
What is the most critical factor for a successful DIY wind turbine?
The most critical factor is having a sufficient and consistent wind resource at your property. Without an average wind speed of at least 10-12 MPH, even the best-built turbine will generate minimal usable power. Accurate site assessment with an anemometer over several months is indispensable.
How much does it cost to build a DIY wind turbine for home use?
The cost varies significantly based on scale and components. A small-scale hobby turbine might cost $50-$300 for materials. A car alternator-based system capable of charging a larger battery bank could range from $300-$1,500. More ambitious custom builds aiming for substantial home power could cost $1,500-$5,000+ for materials alone, excluding tools, safety gear, and potential professional assistance.
Are DIY wind turbines dangerous?
Yes, they can be extremely dangerous if not built and installed correctly. Risks include working at heights, handling high voltages, structural failure in strong winds, and moving blades. Proper engineering, adherence to safety protocols, and meticulous attention to grounding and electrical wiring are crucial. Always prioritize safety over speed or cost savings.
Do I need permits to install a DIY wind turbine?
In most areas, yes. Wind turbines are subject to local building codes, zoning ordinances, and potentially homeowner association (HOA) rules. You may need building permits for the tower, electrical permits for wiring, and possibly zoning variances due to height or noise regulations. Always check with your local planning department before starting your project.
Is DIY wind or DIY solar better for home power?
Both have pros and cons. DIY solar is generally simpler to install, silent, and offers predictable output during the day. DIY wind can generate power 24/7 with sufficient wind, but is mechanically more complex, potentially noisy, and requires specific site conditions and taller structures. For true energy independence, a hybrid system combining both often provides the most consistent and reliable power.
What components are essential for a DIY home wind power system?
The essential components include: the rotor (blades), a generator/alternator, a sturdy tower, a charge controller to protect batteries, a battery bank for storage, an inverter to convert DC to AC power for appliances, and all necessary wiring and safety disconnects. Each component must be correctly sized and integrated for a safe and functional system.