Your Comprehensive Guide to Installing a Small Wind Turbine for Home Power
Dreaming of energy independence? Tired of rising utility bills? Installing a small wind turbine at home can sound incredibly appealing. Imagine harnessing the natural power of the wind to light your home, charge your devices, and even reduce your carbon footprint. It’s not just a pipe dream; it’s a tangible goal for many homeowners.
Table of Contents
- Your Comprehensive Guide to Installing a Small Wind Turbine for Home Power
- Is a Small Wind Turbine Right for Your Home? The Honest Assessment
- Understanding Your Wind Resource: Location, Location, Location
- Grid-Tie vs. Off-Grid: What’s Your Goal?
- Cost vs. Benefit: Crunching the Numbers
- The Pros and Cons of Small Wind Power
- Choosing Your Small Wind Turbine: Key Considerations
- Horizontal Axis vs. Vertical Axis: Which One is For You?
- Sizing Your Turbine: How Much Power Do You Really Need?
- Essential Components Beyond the Turbine
- Navigating the Red Tape: Permits, Zoning, and Regulations
- Local Ordinances and Building Codes
- HOA Restrictions and Neighbor Considerations
- Interconnection Agreements (for Grid-Tied Systems)
- Essential Safety Standards
- The Step-by-Step Installation Process: From Ground Up
- Step 1: Site Preparation and Foundation Laying
- Step 2: Assembling and Erecting the Tower
- Step 3: Mounting the Turbine and Nacelle
- Step 4: Electrical Wiring and Connection
- Step 5: System Testing and Commissioning
- Living with Your Small Wind Turbine: Maintenance and Troubleshooting
- Routine Maintenance Schedule
- Common Troubleshooting Tips
- Safety First: Critical Considerations
- The Future of Your Energy: Beyond Installation
- Integrating with Solar: Hybrid Systems
- Monitoring Your Performance and ROI
- Potential Upgrades and Expansions
- Final Thoughts: Is Small Wind Power for You?
But let’s be real: this isn’t a weekend DIY project for everyone. Installing a small wind turbine involves significant planning, investment, and a solid understanding of both your property and the technology. If you’re serious about taking control of your energy future, you’ve come to the right place. I’m going to walk you through everything you need to know, from assessing your wind potential to the nitty-gritty of installation and long-term maintenance. No fluff, just the honest truth and actionable steps.
Is a Small Wind Turbine Right for Your Home? The Honest Assessment
Before you even think about buying a turbine, you need to ask yourself if small wind power is genuinely a good fit for your specific situation. This isn’t a one-size-fits-all solution, and understanding your circumstances is the first, most critical step.
Understanding Your Wind Resource: Location, Location, Location
This is arguably the single most important factor. A wind turbine, no matter how advanced, is useless without consistent, strong wind. Here’s what you need to consider:
- Average Wind Speed: Most small turbines need an average annual wind speed of at least 9-10 mph (4.0-4.5 m/s) to be economically viable. Less than that, and your turbine might barely spin, let alone generate meaningful power.
- Obstacles and Turbulence: Trees, hills, buildings, and even your own roof can create turbulence and block wind flow. You need to install your turbine on a tower tall enough to clear these obstacles by at least 30 feet (9 meters) to access smooth, uninterrupted wind. Wind maps (like those from the Department of Energy) can give you a general idea, but a site-specific assessment using an anemometer is ideal for accurate data.
- Local Geography: Are you in a wide-open rural area, on a hilltop, or nestled in a valley? Coastal regions and open plains often have better wind resources.
Grid-Tie vs. Off-Grid: What’s Your Goal?
Your motivation for installing a turbine will dictate your system’s design:
- Grid-Tied Systems: These are connected to your local utility grid. When your turbine generates more power than you need, the excess can be fed back into the grid, often earning you credits (net metering). When the wind isn’t blowing, you draw power from the grid. This offers the best of both worlds and typically doesn’t require batteries (though some choose to add them for blackout protection).
- Off-Grid Systems: Ideal for remote homes or those seeking complete energy independence. These systems store excess energy in a battery bank. The downside? Batteries add significant cost and require maintenance. You’ll need a larger turbine and battery bank to ensure consistent power supply, especially during periods of low wind.
Cost vs. Benefit: Crunching the Numbers
Let’s talk money. Small wind turbines aren’t cheap. The total cost can range significantly based on turbine size, tower height, installation complexity, and whether you’re grid-tied or off-grid. A typical residential system might cost anywhere from $10,000 to $70,000+ before incentives.
Here’s a breakdown of common costs:
| Component | Estimated Cost Range (USD) | Notes |
|---|---|---|
| Turbine (1-10 kW) | $3,000 – $35,000 | Varies by size, manufacturer, and quality. |
| Tower (30-120 ft) | $2,000 – $15,000 | Guyed towers are cheaper; self-supporting are more expensive but require less land. |
| Inverter / Charge Controller | $1,000 – $5,000 | Essential for converting DC to AC and managing power. |
| Battery Bank (off-grid) | $3,000 – $15,000+ | Significant cost for off-grid or backup. |
| Wiring, Conduit & Electrical Gear | $500 – $2,500 | Depends on distance from turbine to home. |
| Foundation & Site Prep | $1,000 – $5,000 | Excavation, concrete, rebar. |
| Installation Labor | $2,000 – $10,000+ | Professional installation is highly recommended. |
| Permits & Fees | $100 – $1,000+ | Varies widely by locality. |
| TOTAL ESTIMATED COST | $10,000 – $70,000+ | Before any tax credits or incentives. |
However, there are incentives! The federal Investment Tax Credit (ITC) offers a significant tax credit for renewable energy systems, including small wind. Many states and local utilities also offer rebates or incentives. These can substantially reduce your net cost and improve your return on investment (ROI). Your payback period could range from 6 to 20 years, depending heavily on wind resource, electricity rates, and available incentives.
The Pros and Cons of Small Wind Power
It’s important to have a balanced perspective:
Pros:
- Clean, Renewable Energy: Reduces your carbon footprint.
- Energy Independence: Less reliance on the grid and fluctuating energy prices.
- Works at Night: Unlike solar, wind turbines generate power 24/7 as long as there’s wind.
- Long Lifespan: Well-maintained systems can last 20-25 years or more.
- Potential for Net Metering: Earn credits for excess power sent back to the grid.
Cons:

- High Upfront Cost: Significant initial investment.
- Intermittent Power: Wind isn’t constant; power generation fluctuates.
- Noise: While modern turbines are much quieter, some noise can still be a concern for close neighbors.
- Aesthetics: Not everyone appreciates a wind turbine in their backyard.
- Permitting Challenges: Zoning laws and HOA restrictions can be difficult to navigate.
- Requires Ample Space: Both for the turbine and its fall zone.
Choosing Your Small Wind Turbine: Key Considerations
Once you’ve determined that small wind is viable for your property, the next big decision is selecting the right turbine. This goes beyond just looking at the price tag.
Horizontal Axis vs. Vertical Axis: Which One is For You?
Small wind turbines primarily come in two configurations, each with distinct advantages and disadvantages:
| Feature | Horizontal Axis Wind Turbine (HAWT) | Vertical Axis Wind Turbine (VAWT) |
|---|---|---|
| Appearance | Traditional propeller-like blades, typically on a tall tower. | Egg-beater (Darrieus) or S-shaped (Savonius) blades, often shorter and wider. |
| Wind Direction | Must yaw (turn) to face the wind; requires a tail fin or active motor. | Omnidirectional; captures wind from any direction, no yaw mechanism needed. |
| Efficiency | Generally more efficient in steady, high winds. | Typically less efficient than HAWTs, especially at higher wind speeds. |
| Starting Wind Speed | Requires higher wind speeds to start generating power. | Can start generating power at lower wind speeds. |
| Noise Level | Can be quieter at the turbine, but tower height means noise travels. | Often perceived as quieter due to lower rotational speeds and ground-level generator. |
| Maintenance | Generator and gearbox are at the top, requiring tower climbing or lowering. | Generator is often at the bottom, making maintenance easier and safer. |
| Ideal Application | Open, un-turbulent areas with consistent high winds; rural homes, farms. | Urban environments, areas with turbulent winds, roof-mounted (though generally not recommended). |
For most residential applications seeking maximum output, a well-sited HAWT is often preferred, but VAWTs are gaining traction for niche uses or where space/aesthetics are critical.
Sizing Your Turbine: How Much Power Do You Really Need?
This is where your energy audit comes in handy. Review your past electricity bills to determine your average monthly kWh consumption. Most homes consume between 500-1,500 kWh per month. Small wind turbines are rated in kilowatts (kW), typically ranging from 1 kW to 10 kW for residential use.
- A 1 kW turbine in a good wind resource (e.g., 12 mph average) might produce 1,500-2,000 kWh per year.
- A 5 kW turbine in the same conditions could produce 7,000-10,000 kWh per year.
Remember, these are estimates. Actual output depends heavily on your specific wind resource. It’s often better to slightly undersize and supplement with grid power or solar than to oversize and have an uneconomical system.
Essential Components Beyond the Turbine
The turbine itself is just one piece of the puzzle. You’ll also need:
- Tower: Can be guyed (supported by cables) or free-standing (self-supporting). Guyed towers are cheaper but require more land. Self-supporting towers are more expensive but have a smaller footprint.
- Inverter: Converts the direct current (DC) electricity generated by the turbine into alternating current (AC) used by your home appliances and the grid.
- Charge Controller: Protects your batteries (if off-grid) from overcharging and ensures efficient charging. Also helps prevent the turbine from spinning too fast in high winds.
- Batteries: Crucial for off-grid systems to store energy. Not strictly necessary for grid-tied, but can provide backup power.
- Wiring and Conduits: To safely transmit power from the turbine to your home’s electrical panel.
- Disconnects: Manual and automatic switches to safely shut down the system for maintenance or emergencies.
Navigating the Red Tape: Permits, Zoning, and Regulations
This is often the most frustrating but absolutely critical step. Skipping it can lead to hefty fines, forced removal, or even safety hazards. Don’t underestimate this phase!
Local Ordinances and Building Codes
Every county, city, and even township will have specific rules for wind turbine installations. You’ll likely need:
- Building Permits: For the tower foundation and structure.
- Electrical Permits: For all wiring and connections to your home’s electrical system.
- Zoning Permits: These are key. Many areas have restrictions on:
- Height Limits: How tall your tower can be.
- Setbacks: Minimum distance from property lines, other buildings, and public roads.
- Noise Regulations: Decibel limits.
- Fall Zone Requirements: The area around the tower must be clear in case it falls.
Start by contacting your local planning or zoning department. They can provide you with relevant codes and application forms. Be prepared for a process that can take weeks or even months.
HOA Restrictions and Neighbor Considerations
If you live in a community with a Homeowners Association (HOA), they might have additional, stricter rules or even outright bans on wind turbines. Review your HOA covenants carefully. Even without an HOA, it’s a good idea to talk to your neighbors. A turbine can affect their views, and addressing concerns proactively can prevent future disputes.
Interconnection Agreements (for Grid-Tied Systems)
If you plan to connect your turbine to the utility grid (grid-tied), you’ll need an interconnection agreement with your local utility company. This process ensures your system meets their safety and technical standards and allows for net metering. They will require detailed drawings and specifications of your system. This can be another lengthy process requiring inspections.
Essential Safety Standards
Beyond local codes, adhere to national electrical codes (like the NEC) and safety best practices. Ensure all components are rated for outdoor use and proper grounding is in place. Work with licensed electricians and certified installers to ensure compliance and safety.

The Step-by-Step Installation Process: From Ground Up
Alright, you’ve done your homework, secured your permits, and have your chosen turbine ready. Now for the exciting part: installation. This is a general guide, and specifics will vary by turbine model and tower type. Always follow the manufacturer’s instructions precisely, and seriously consider hiring professionals for the heavy lifting and electrical work.
A critical note on safety: Working with heavy equipment, at heights, and with electricity is inherently dangerous. Never attempt this alone. Wear appropriate personal protective equipment (PPE) including hard hats, safety glasses, gloves, and fall protection when working at height. Ensure all power is disconnected before working on electrical components.
Step 1: Site Preparation and Foundation Laying
This is where it all begins. A solid foundation is non-negotiable for stability.
- Mark the Site: Precisely identify the turbine’s location according to your site plan and permit. Mark the center point and the perimeter for the foundation. For guyed towers, mark the anchor points as well.
- Excavation: Dig the foundation hole to the specified dimensions (depth and diameter) outlined in your turbine’s manual and engineering plans. This could be a substantial hole, perhaps 9 feet in diameter and 3-4 feet deep, depending on tower size and soil type.
- Formwork and Rebar: Construct any necessary formwork. Lay down a grid of steel rebar within the hole, connecting it securely. This provides the tensile strength for the concrete. Ensure the rebar cage is positioned correctly for the tower base.
- Conduit Placement: Run electrical conduit from the base of the tower to your home’s electrical panel. Ensure it’s buried below the frost line and protected.
- Pour Concrete: Pour high-strength concrete into the excavation. Ensure the concrete is properly vibrated to remove air pockets. Position the tower base plate (or anchor bolts) accurately and level before the concrete cures. This is your one chance to get it right! Allow sufficient curing time (typically 7-28 days) before proceeding.
Step 2: Assembling and Erecting the Tower
Tower erection is often the most complex and dangerous part of the installation.
- Tower Assembly (Horizontal): If you have a tilt-up tower, assemble it horizontally on the ground near the foundation. Attach all necessary climbing rungs, safety lines, and wiring conduits.
- Install Guy Wires (if applicable): For guyed towers, attach the guy wires to the tower sections before raising. Ensure they are correctly tensioned and anchored according to the manufacturer’s specifications.
- Pre-Wire the Tower: Run the down-conductor wiring through the tower’s conduit system. Leave enough slack at the top for the turbine connection and at the bottom for the control panel.
- Erecting the Tower: This typically requires heavy equipment (crane, gin pole, or hoist) and experienced personnel. Whether it’s a tilt-up, gin-pole raise, or crane lift, safety protocols are paramount. Secure the tower to the foundation using anchor bolts, ensuring it is perfectly vertical (plumb). For guyed towers, properly tension all guy wires.
Step 3: Mounting the Turbine and Nacelle
The nacelle houses the generator and other critical components. The blades are usually attached last.
- Lift Nacelle to Tower Top: Using a crane or a winch system, carefully lift the turbine nacelle (the body containing the generator) to the top of the tower.
- Secure Nacelle: Mount and bolt the nacelle securely onto the tower mast. Ensure it can rotate freely (yaw) if it’s a HAWT.
- Connect Electrical: Connect the turbine’s internal wiring to the down-conductor cables you ran through the tower. Use weather-resistant connectors and ensure all connections are tight and insulated.
- Blade Assembly: Attach the blades to the turbine hub. This often happens on the ground before lifting the nacelle, or sometimes individually at the top, depending on turbine design. Be extremely careful not to damage the blades. Ensure they are balanced and securely fastened.
- Install Tail Fin (HAWT only): Attach the tail fin, which helps the HAWT face into the wind.
Step 4: Electrical Wiring and Connection
This phase is strictly for licensed electricians unless you are a qualified professional yourself.
- Run Conduit to Home: The buried conduit should lead to a junction box or the main electrical panel inside your home or utility shed.
- Install Charge Controller: Mount the charge controller (essential for off-grid or systems with batteries) in a protected, accessible location.
- Install Inverter: Mount the inverter. For grid-tied systems, it will connect to your home’s main electrical panel. For off-grid, it connects to the battery bank and then to your home’s sub-panel.
- Battery Bank Wiring (if applicable): Wire the battery bank according to the manufacturer’s specifications, ensuring proper series/parallel connections for the desired voltage and capacity. Include all necessary fuses and disconnects.
- Grounding: Install a robust grounding system for the tower and all electrical components to protect against lightning strikes and electrical faults.
- Main Electrical Panel Connection: Connect the system to your home’s main electrical panel, typically via a dedicated breaker. This is where your utility meter (for grid-tied) will register energy flow.
Step 5: System Testing and Commissioning
The moment of truth!
- Pre-Commissioning Checks: Before applying power, perform thorough visual inspections. Check all bolts, electrical connections, and grounding. Verify all safety disconnects are accessible.
- Initial Power On: With safety precautions in place, activate the system. Observe the turbine’s rotation and listen for unusual noises.
- Voltage and Current Checks: Using a multimeter, verify voltage and current outputs at various points (turbine, charge controller, inverter).
- Output Monitoring: Observe the system’s power generation under different wind conditions.
- Utility Inspection (Grid-Tied): For grid-tied systems, your utility company will need to perform a final inspection and approve the interconnection before you can officially operate and net meter.
- Educate Yourself: Understand your system’s monitoring tools, safety procedures, and shutdown processes.
Living with Your Small Wind Turbine: Maintenance and Troubleshooting
Installation is just the beginning. To ensure your investment provides reliable power for decades, regular maintenance is crucial. And inevitably, things can go wrong, so knowing some basic troubleshooting is key.
Routine Maintenance Schedule
Following a manufacturer-recommended schedule is paramount. Here’s a general guide:
- Monthly:
- Visually inspect the turbine for obvious damage, loose wires, or unusual noises.
- Check for debris caught in the blades.
- Monitor system performance via your inverter or monitoring app.
- Quarterly:
- Check battery fluid levels (if lead-acid) and clean terminals.
- Inspect all visible wiring for wear or damage.
- Ensure disconnect switches are functioning.
- Annually:
- Tower Inspection: Check for rust, loose bolts, and structural integrity. Inspect guy wires for proper tension and anchor points.
- Turbine Inspection: Inspect blades for cracks, nicks, or erosion. Check all fasteners on the nacelle.
- Lubrication: Lubricate yaw and pitch mechanisms (if applicable) according to manufacturer guidelines.
- Electrical System Check: Have a qualified electrician inspect all connections, grounding, and surge protection.
- Inverter and Charge Controller Check: Ensure they are clean, functioning correctly, and firmware is updated if necessary.
- Every 3-5 Years:
- Consider a professional inspection and potentially re-tensioning of guy wires.
- Inspect and potentially replace critical wear parts.
Common Troubleshooting Tips
Don’t panic if your turbine isn’t performing as expected. Here are some common issues and what to check:
- No Power Output / Turbine Not Spinning:
- Is there wind? Obvious, but often overlooked. Check local weather.
- Are disconnects engaged? Ensure all manual disconnect switches are ‘ON’.
- Tripped Breaker? Check the breaker in your main electrical panel.
- Turbine Brake Engaged? Some turbines have a manual brake or an automatic over-speed protection that can temporarily stop rotation.
- Debris: Is something physically obstructing the blades?
- Icing: In cold climates, ice can prevent rotation.
- Intermittent Power Output:
- Fluctuating Wind: Wind speed naturally varies.
- Loose Connection: Check electrical connections from the turbine down to the inverter.
- Inverter Fault: Check the inverter’s display for error codes.
- Unusual Noise or Vibrations:
- Loose Blades or Components: Shut down the turbine immediately and have it inspected. This is a safety hazard.
- Bearing Wear: Can indicate a mechanical issue requiring professional attention.
- Low Power Production:
- Insufficient Wind: Your site’s wind resource might be lower than anticipated.
- Turbine Yaw Issues (HAWT): Is the turbine correctly facing into the wind? Is the tail fin damaged or stuck?
- Blade Damage: Even minor nicks can reduce efficiency.
- System Inefficiency: Old batteries, faulty charge controller, or inverter issues can reduce overall output.
For any serious mechanical issues, or if you’re uncomfortable troubleshooting electricity, always call a qualified technician.
Safety First: Critical Considerations
- Lock-Out/Tag-Out: Before any maintenance, ensure all power sources are disconnected and locked out.
- Working at Height: Use proper fall protection and safety equipment. Avoid working in high winds or inclement weather.
- Electrical Safety: Always assume wires are live. Use insulated tools and never work alone on electrical components.
- Fall Zone: Keep the area around the tower clear, especially during high winds or maintenance.
- Emergency Shutdown: Know how to quickly and safely shut down your system in an emergency (e.g., severe storm, fire).
The Future of Your Energy: Beyond Installation
Once your small wind turbine is up and running, it’s not just a set-and-forget system. It becomes an active part of your home’s energy ecosystem, with opportunities for optimization and expansion.

Integrating with Solar: Hybrid Systems
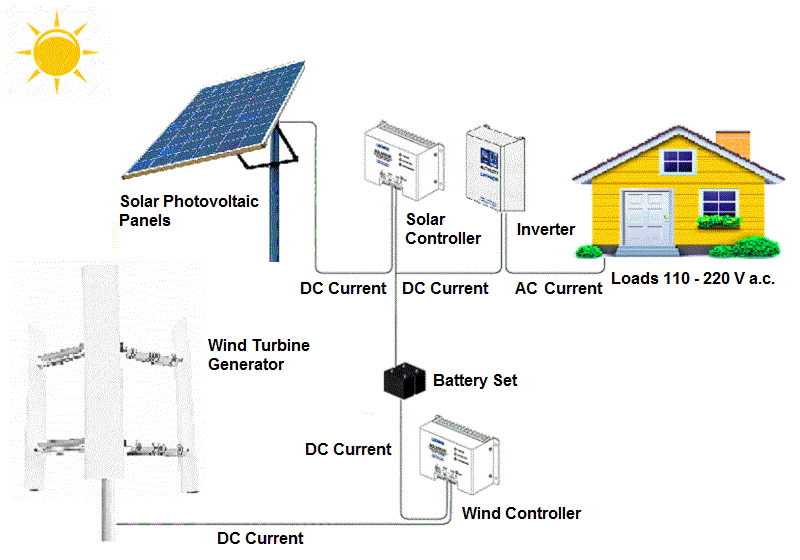
Many homeowners find that combining wind and solar power (a hybrid system) offers the best of both worlds. Solar panels produce most during sunny days, while wind turbines can produce power day and night, especially during cloudy, windy conditions when solar output might be low. This complementarity can lead to a more consistent and reliable power supply, significantly reducing reliance on the grid and improving energy independence, particularly for off-grid scenarios.
Monitoring Your Performance and ROI
Most modern inverters and charge controllers come with monitoring capabilities, often accessible via a smartphone app or web portal. Regularly tracking your turbine’s performance (kWh generated, current wind speed, battery status) allows you to:
- Verify Output: Ensure it’s performing as expected based on your wind resource.
- Identify Issues: Early detection of performance drops can signal a maintenance need.
- Calculate Savings: Quantify your energy savings and track your return on investment over time.
Potential Upgrades and Expansions
As your energy needs change or technology evolves, you might consider:
- Battery Bank Expansion: If you’re off-grid or want more backup capacity, adding more batteries can extend your autonomy.
- Smart Home Integration: Integrating your energy monitoring with smart home systems can optimize energy usage.
- Efficiency Upgrades: Investing in more energy-efficient appliances can reduce your overall demand, making your turbine’s output go further.
- Turbine Upgrades: While less frequent, technological advancements might lead to more efficient or quieter turbines in the distant future.
Final Thoughts: Is Small Wind Power for You?
Installing a small wind turbine is a significant undertaking, but for the right property and the right homeowner, it can be an incredibly rewarding investment in energy independence and sustainability. It requires a realistic understanding of your wind resource, a willingness to navigate permits, and a commitment to proper installation and ongoing maintenance. While it’s not the silver bullet for every home, if you have sufficient wind, the space, and the determination, harnessing the power of the wind can be a truly empowering experience. Do your research, assess your site thoroughly, and don’t hesitate to seek professional guidance at every stage.
Frequently Asked Questions
How much does it cost to install a small wind turbine for a home?
The total cost for a residential small wind turbine system typically ranges from $10,000 to $70,000+, depending on the turbine size (1-10 kW), tower height, installation complexity, and whether it’s a grid-tied or off-grid system. This includes the turbine, tower, inverter, wiring, foundation, and labor. Incentives like the federal Investment Tax Credit can significantly reduce the net cost.
Is my home suitable for a small wind turbine?
Suitability primarily depends on your average annual wind speed. Most small turbines need at least 9-10 mph (4.0-4.5 m/s) to be economically viable. You also need sufficient clear space for the tower, free from obstacles (trees, buildings) that create turbulence. Contacting local planning departments for zoning and height restrictions is also a crucial early step.
What’s the difference between horizontal axis (HAWT) and vertical axis (VAWT) small wind turbines?
Horizontal Axis Wind Turbines (HAWTs) are the traditional propeller-style turbines; they are generally more efficient in steady, high winds and must yaw (turn) to face the wind. Vertical Axis Wind Turbines (VAWTs) have blades that rotate around a vertical shaft (e.g., egg-beater shape); they are omnidirectional, operate in more turbulent winds, and can start at lower wind speeds, often perceived as quieter, but generally less efficient overall.
Do I need permits to install a small wind turbine?
Yes, almost always. You will typically need building permits for the tower foundation and structure, electrical permits for wiring, and zoning permits that address height limits, setbacks from property lines, and noise regulations. Local Homeowners Associations (HOAs) may also have additional restrictions. It’s crucial to check with your local planning department and utility company early in the process.
How much maintenance does a small wind turbine require?
Small wind turbines require regular maintenance to ensure optimal performance and longevity. This includes monthly visual inspections, quarterly checks of batteries (if off-grid) and wiring, and annual inspections of the tower, blades, and electrical components. Lubrication and professional electrical checks every few years are also recommended. Following the manufacturer’s specific maintenance schedule is key.
Can I combine a small wind turbine with solar panels?
Absolutely! Hybrid wind-solar systems are increasingly popular. They offer a more consistent and reliable power supply because wind often produces power when solar output is low (e.g., at night or on cloudy, windy days), and vice-versa. This complementarity maximizes energy capture and can further reduce your reliance on the grid, especially for off-grid applications.
Is DIY installation recommended for a small wind turbine?
While some smaller, simpler turbines might allow for some DIY components, the complete installation of a substantial residential wind turbine (including tower erection, foundation laying, and grid-tie electrical work) is highly complex and dangerous. It involves heavy equipment, working at heights, and high-voltage electricity. For safety, compliance, and optimal performance, it is strongly recommended to hire licensed electricians and certified wind energy installers for critical stages of the project.
)